How to Install a Drip Irrigation System Step by Step (Complete 2026 Guide)
Installing a drip irrigation system is one of the most impactful improvements you can make to your garden — especially in Riyadh’s extreme desert climate where water is scarce, expensive, and absolutely critical for plant survival.
The problem? Most guides online are written for temperate climates with abundant rainfall and mild temperatures. They skip the critical details that matter most in Saudi Arabia — desert-rated materials, heat-resistant fittings, sand-resistant filters, and scheduling strategies for 45°C summers.
This guide is different. It covers every single step of drip irrigation installation — from planning your system on paper, to choosing the right components, to running your first test cycle — with specific advice for Riyadh’s conditions at every stage. Whether you’re installing yourself or supervising a contractor, this guide gives you the knowledge to do it right.
- Why Drip Irrigation is Essential in Riyadh
- How a Drip Irrigation System Works
- All Components You Need
- Tools & Materials Checklist
- Step 1 — Plan & Design Your System
- Step 2 — Connect to Your Water Source
- Step 3 — Lay the Main Supply Line
- Step 4 — Install Lateral Lines to Plant Zones
- Step 5 — Install Drip Emitters & Stakes
- Step 6 — Install Timer & Controller
- Step 7 — Test, Flush & Calibrate the System
- Step 8 — Apply Mulch & Finalise Installation
- Step 9 — Set Your Watering Schedule
- Ongoing Maintenance Guide
- Troubleshooting Common Problems
- Frequently Asked Questions
🌵 Why Drip Irrigation Is Essential for Riyadh Gardens
The Desert AdvantageBefore diving into installation, it’s worth understanding why drip irrigation is not just recommended but genuinely essential for any garden in Riyadh or anywhere in Saudi Arabia. This context helps you make better installation decisions at every step.
- Temperatures exceed 45–50°C in summer — hand-watered plants can dehydrate within hours
- Annual rainfall is only 60–100mm — virtually all garden water must come from irrigation
- Sandy soil drains water extremely fast — targeted root-zone delivery is the only efficient option
- Water costs in Riyadh have risen significantly — wasteful irrigation is an expensive problem
- UV radiation causes rapid evaporation from any surface moisture — subsurface or drip delivery is critical
Drip vs. Hand Watering
- Saves 60–70% more water per plant
- Consistent delivery — no missed days
- No evaporation from leaf surfaces
- Works automatically even when you travel
- No waterlogging risk between sessions
Drip vs. Sprinklers
- 40–50% more efficient than sprinklers
- No water lost to wind or evaporation
- No leaf burn from water droplets in sun
- Reduces weed growth between plants
- Better for individual plant targeting
⚙️ How a Drip Irrigation System Works
Understand Before You BuildA drip irrigation system moves water from your mains supply through a series of pipes, filters, and pressure regulators, ultimately delivering it at a slow, controlled rate directly to the root zone of each plant. Understanding the flow path helps you troubleshoot problems and make better installation decisions.
- Water source → connects to your main water supply (tap, tank, or pump)
- Backflow preventer → stops contaminated garden water entering your drinking supply
- Filter / screen → removes sand, sediment, and particles that clog emitters
- Pressure regulator → reduces mains pressure to safe drip system levels (1–2 bar)
- Timer / controller → automates when and how long the system runs
- Main supply line → large diameter pipe that carries water across your garden
- Lateral lines → smaller diameter tubing branching off to plant zones
- Drip emitters → the final delivery point — releases water drop by drop to each plant root
Each component in this chain plays a critical role. Skipping or under-specifying any single component — especially the filter in Riyadh’s sandy environment — causes system failure, wasted water, and dead plants.
🔧 All Components You Need for a Drip System
Complete Parts ListKnowing what each component does — and why it matters specifically for Riyadh’s conditions — helps you make the right purchasing decisions and avoid cheap substitutes that fail quickly in desert heat.
Backflow Preventer
A mandatory safety device that prevents irrigation water from flowing back into your drinking water supply. Required by building regulations in Saudi Arabia.
Y-Filter / Screen Filter
Removes sand, sediment, and particles before they reach your emitters. In Riyadh’s sandy environment, a 120-mesh or finer filter is essential — standard filters clog within weeks.
Pressure Regulator
Reduces mains water pressure to 1.0–1.5 bar — the ideal range for drip emitters. Too much pressure blows emitters off; too little causes uneven delivery across your garden zones.
Timer / Irrigation Controller
Automates your watering schedule. Basic mechanical timers start at 50–100 SAR. Smart Wi-Fi controllers with weather sensors (300–1,500 SAR) adjust automatically for Riyadh’s temperature swings.
Main Supply Line (Header Pipe)
The primary pipe that carries water from your supply point across the garden. Use 25mm or 32mm polyethylene pipe rated for UV exposure and outdoor use. Never use plain PVC — it cracks in Riyadh’s heat.
Lateral Drip Tubing
Smaller diameter tubing (12–16mm) that branches off your main line to individual plant rows or zones. Choose black polyethylene tubing with UV stabilization for outdoor exposure in Saudi Arabia.
Drip Emitters
The delivery points that release water at controlled flow rates. Choose flow rate based on plant type: 2 L/hr for small shrubs, 4 L/hr for medium plants, 8 L/hr for trees and palms. Pressure-compensating emitters give even delivery across hilly terrain.
Connectors, Elbows & Tees
Fittings that connect pipes, create branches, and navigate corners. Use barbed fittings for polyethylene tubing — they grip more securely than push-fit fittings in high-temperature environments where pipe expansion occurs.
End Caps & Figure-8 Closures
Seal the ends of all tubing runs. Critical for maintaining correct system pressure. Always use proper end caps — never fold and tie tubing ends, which fails within weeks in the heat.
Tubing Stakes & Hold-Downs
Secure tubing flat against the soil surface. Without stakes, tubing moves in wind, emitters shift position, and delivery becomes inconsistent. Use every 50–60cm in open areas.
Micro-Tubing & Stakes (for pots)
4mm micro-tubing with individual stakes delivers water precisely to container plants, pots, and raised beds where larger tubing cannot be routed efficiently.
Punch Tool & Goof Plugs
The punch tool creates holes in tubing for emitter insertion. Goof plugs seal mistakes — always buy extra because you will misplace holes during installation. Keep a full bag on hand.
🛠️ Tools & Materials Checklist
Everything You Need Before StartingGather all tools and materials before beginning installation. Running back to the hardware store mid-installation wastes hours and often means leaving pipe runs open to sand and debris in Riyadh’s dusty conditions.
| Tool / Item | Purpose | Necessity | Approx. Cost (SAR) |
|---|---|---|---|
| Tape measure (20m+) | Measure garden zones and pipe runs | Must Have | 15–40 |
| Garden plan / sketch | Map plant positions and pipe routes | Must Have | Free |
| Tubing punch tool | Create holes for emitter insertion | Must Have | 15–35 |
| Sharp scissors / pipe cutter | Cut tubing cleanly without crushing | Must Have | 10–50 |
| Flat-head screwdriver | Tighten clamps and help push fittings | Must Have | 10–25 |
| Adjustable spanner / wrench | Secure threaded connections at water source | Must Have | 20–60 |
| PTFE thread seal tape | Seal threaded pipe connections | Must Have | 5–15 |
| Bucket of hot water | Soften tubing for easier fitting insertion | Recommended | Free |
| Pressure gauge | Verify correct system pressure during testing | Recommended | 30–80 |
| Marking spray / stakes | Mark pipe run routes before digging | Recommended | 10–25 |
| Cable ties / zip ties | Bundle and secure tube runs to walls or fences | Recommended | 5–15 |
| Garden gloves | Protect hands during installation | Optional | 15–40 |
| Knee pads | Comfort during ground-level work | Optional | 30–80 |
| Smartphone with garden plan photo | Reference your layout without unfolding paper | Recommended | Free |
Buy drip irrigation components from specialist irrigation suppliers rather than general hardware stores. Always specify “UV-stabilized” and “desert-rated” for any plastic components — standard components sold at general hardware stores often have no UV rating and degrade within 1–2 years under Riyadh’s sun.
🗺️ The Complete Installation Process — Step by Step
9 Steps to a Working SystemFollow these steps in order. Each step builds on the previous one — rushing ahead without completing earlier stages properly is the most common cause of system failures that require expensive rework.
📐 Plan & Design Your System
Time required: 1–3 hours · Done on paper before buying anythingPlanning is the most important step — and the one most beginners skip. A properly designed system uses exactly the right amount of pipe, emitters, and zones. Poor planning means buying too much of some things, not enough of others, and discovering problems only after installation.
Draw Your Garden Map
Sketch your garden to scale on paper. Mark every plant position, every pathway, every structure, and every wall. Include your water source location (outdoor tap or tank connection point) and measure the distance from the source to the furthest plant in your garden — this determines your main line length.
- ✓Measure total garden area Length × width of each planting zone in square meters
- ✓Count total number of plants Each plant needs its own emitter — small plants may share if close together
- ✓Group plants by water requirement High-water plants in one zone, drought-tolerant in another — never mix on the same line
- ✓Plan your main line route Run the main line along the perimeter or central path — minimize bends for better pressure
- ✓Calculate pipe lengths needed Main line + all lateral runs + 15% extra for wastage and adjustments
- ✓Identify number of zones One zone per water circuit on your controller — typically 2–6 zones for a villa garden
Calculate Your Flow Rate Capacity
Your water source has a maximum flow rate. If you connect too many emitters to a single zone, pressure drops and outer emitters deliver less water than inner ones. The formula: count total emitter flow rates in a zone (in L/hr) and ensure they don’t exceed 80% of your tap’s maximum flow.
Test your tap’s maximum flow: fill a 10-liter bucket and time how long it takes. Multiply: 10 ÷ seconds × 3600 = L/hr. This is your maximum zone flow rate. Never exceed 80% of this figure per zone.
Choose Emitter Flow Rates for Your Plants
| Plant Type | Recommended Emitters | Flow Rate | Notes |
|---|---|---|---|
| Small herbs & ground cover | 1 emitter per plant | 1–2 L/hr | Place 10–15cm from stem |
| Medium shrubs & flowers | 1–2 emitters per plant | 2–4 L/hr | Place 20–25cm from stem |
| Large shrubs & hedges | 2–3 emitters per plant | 4 L/hr each | Spread evenly around root zone |
| Young trees (under 2m) | 2–4 emitters | 4–8 L/hr each | Ring pattern around drip line |
| Mature trees & palms | 4–8 emitters | 8 L/hr each | Spread in 60–80cm ring |
| Cacti & succulents | 1 emitter per plant | 0.5–1 L/hr | Very low flow — easy to overwater |
| Container / potted plants | 1 micro-stake per pot | 1–2 L/hr | Use 4mm micro-tubing |
✅ Step 1 complete when: You have a paper sketch showing all plant zones, the main line route, lateral branch positions, total pipe lengths, emitter count per plant type, and number of irrigation zones required.
🚰 Connect to Your Water Source
Time required: 30–60 minutes · Get the foundation connection rightThe water source connection is where most amateur installations fail long-term. A poorly made connection leaks, corrodes in Riyadh’s heat, or allows contamination. Take extra time here — you won’t be accessing this connection regularly once the system is running.
Standard Connection Sequence
Connect components to your outdoor tap in this exact order — each component must go in the right position or the system won’t function correctly:
- 1Outdoor tap (your water source) The starting point — ensure the tap is in good working order with no drips before connecting
- 2Backflow preventer Thread on first — wrap male thread with PTFE tape (3 wraps) before connecting
- 3Y-filter / screen filter Orient with the filter cap pointing downward for easy cleaning access
- 4Pressure regulator Check the output pressure marking — it should read 1.0–1.5 bar for standard drip systems
- 5Irrigation timer / controller If using a tap timer, it goes here; if using an electric controller, the solenoid valve connects here
- 6Hose adapter to main supply line The final fitting before your poly pipe begins — ensure it’s rated for the pipe diameter you’re using
Critical Installation Details
Wrap every threaded male connection with 3–4 layers of PTFE thread seal tape wound clockwise. Finger-tighten first, then give an additional ¼–½ turn with a spanner. Over-tightening cracks fittings — especially plastic components that become brittle in Riyadh’s heat.
Never use metal fittings against plastic fittings without a rubber washer. Direct metal-to-plastic connections develop micro-cracks under Riyadh’s thermal expansion and contraction cycles — causing leaks within 6–12 months.
✅ Step 2 complete when: All components are connected in the correct sequence, all threads are sealed with PTFE tape, and a brief water-on test shows zero leaks at any connection point.
🔵 Lay the Main Supply Line
Time required: 1–3 hours depending on garden sizeThe main supply line (header pipe) is the backbone of your entire system. It carries water from your source point out to all zones in your garden. Routing it correctly determines whether your system delivers even pressure to every plant or leaves outer zones under-watered.
Main Line Routing Principles
- ✓Run the shortest possible route to the furthest zone Every additional meter of pipe increases pressure drop — keep runs as direct as possible
- ✓Run along walls, paths, and fence lines Keeps the line protected from foot traffic and looks neat when visible
- ✓Avoid running across high-traffic areas unless buried If crossing a walkway, bury the pipe 10–15cm below grade in conduit for protection
- ✓Leave enough pipe at each branch point Add 20–30cm extra length at every planned tee connection point
- ✓Stake or secure the main line every 1–1.5 meters Unsecured pipe shifts significantly with Riyadh’s thermal expansion cycles
Connecting Main Line to Water Source
If your main line is 25mm polyethylene pipe, cut a clean square end and push it firmly into the barbed fitting at your source connection. Warm the end of the pipe briefly in hot water (or leave in the sun for 10 minutes) to soften it — this makes insertion significantly easier and creates a tighter seal around the barb.
Handling Thermal Expansion in Riyadh’s Heat
Polyethylene pipe expands significantly in Riyadh’s heat — a 20-meter pipe run can grow by 3–5cm on a hot summer day. Always install your main line with gentle S-curves rather than perfectly straight runs. These slight curves absorb expansion without stressing fittings or pulling connections apart.
Install main lines in early morning when pipes are cool and at their shortest. If you lay pipe while it’s hot and expanded, it will contract overnight and pull fittings loose. Morning installation = fittings stay secure year-round.
✅ Step 3 complete when: Main supply line runs from the source connection to all planned branch points, is secured to the ground or wall every 1–1.5m, has gentle S-curves built in, and all ends are temporarily capped to prevent debris entry.
🔴 Install Lateral Lines to Plant Zones
Time required: 2–5 hours · The most hands-on installation phaseLateral lines are the smaller tubing runs that branch off your main supply line and route water through each plant zone. This is where your paper plan comes to life — and where careful routing determines whether every plant receives consistent water delivery.
Creating Branch Points on the Main Line
Use a barbed tee fitting to create each branch point. Cut the main line at the planned location, insert the tee fitting (warm the pipe first for easier insertion), and secure both sides firmly. The tee’s branch port then accepts your lateral line tubing.
- ✓Cut main line cleanly with pipe cutters or sharp scissors Never cut with a hacksaw — it leaves rough edges that prevent complete sealing
- ✓Warm pipe end before inserting tee fitting Hold in hot water for 30 seconds — the fitting should push in smoothly with firm hand pressure
- ✓Push fitting in as far as it will go The barb must be fully seated — a partially inserted fitting is the #1 cause of pop-off failures
- ✓Secure tee position with tubing stake on each side Prevents the fitting from being pulled out by the weight of the lateral line
Running Lateral Lines Through Plant Zones
Route lateral tubing through plant zones, positioning it to pass within emitter-reach of every plant. Stake the tubing every 50–60cm and at every direction change. Leave 20–30cm of extra tubing at every plant position — you’ll need the slack when inserting emitters.
Handling Corners and Direction Changes
Use elbow fittings for 90-degree turns. Never sharply bend tubing to make corners — kinked tubing restricts water flow and weakens the pipe wall, leading to splits during Riyadh’s high-pressure summer water supply periods.
End All Lateral Lines with End Caps
Every lateral line must be sealed at its end with a proper end cap or figure-8 closure. This is not optional — open ends dump all your water pressure at the end of the line, leaving plants along the run dehydrated.
✅ Step 4 complete when: All lateral lines are routed through plant zones, secured every 50–60cm, passing near each plant position, and sealed at all ends with proper caps. Take a photo of the full layout for future reference.
💧 Install Drip Emitters at Each Plant
Time required: 2–4 hours · The most critical accuracy stepInstalling emitters correctly determines whether your plants actually receive the right amount of water at the right location. Emitter position relative to the plant’s root zone is as important as flow rate. Too close to the stem causes crown rot. Too far out doesn’t reach the active root zone.
Punching Emitter Holes
Use your punch tool to create holes in the lateral tubing at each emitter position. The punch must create a clean, round hole — not a tear or elongated slot. A clean hole grips the emitter barb firmly and prevents leaks. If you create a misaligned hole, plug it immediately with a goof plug and punch a new hole nearby.
- ✓Hold tubing firmly on a flat surface when punching Never punch in mid-air — the tubing must be supported to create a clean hole
- ✓Use a single firm downward punch — no twisting Twisting creates oval holes that leak around the emitter barb
- ✓Insert emitter immediately after punching Leaving holes open for more than a few minutes allows sand to enter in Riyadh’s dusty conditions
- ✓Push emitter barb fully into the hole until the flange seats against the tubing A fully seated emitter shows no gap between the emitter body and the tubing surface
Correct Emitter Placement Distances
Position emitters based on plant size and root zone extent. The goal is to wet the active feeder root zone — the area where most water uptake occurs — not just the immediate stem base.
- Small plants & herbs: 10–15cm from the stem — single emitter is sufficient
- Medium shrubs: 20–30cm from stem — use 2 emitters on opposite sides
- Large shrubs & hedges: 30–40cm from stem — 2–3 emitters spread around plant
- Young trees: 40–60cm from stem — 3–4 emitters in a ring pattern
- Mature trees & palms: 60–80cm from stem — 4–8 emitters in a full ring
- Container plants: 1 micro-stake per container, centered in the pot
Using Micro-Tubing Extensions
When your lateral line doesn’t pass close enough to a plant, use a short length of 4mm micro-tubing to extend from an emitter port to the plant’s root zone. Keep micro-tubing runs under 60cm — longer runs cause significant pressure drop and uneven delivery.
In Riyadh’s summer heat, mark each emitter position with a small stake or flag during installation. Once the system runs, check that water is actually wetting the correct root zone — heat and sandy soil mean you need to verify actual penetration depth, not just surface wetness.
✅ Step 5 complete when: Every plant in your garden has the correct number of emitters, at the correct distance from the stem, with all emitter barbs fully seated in clean holes. Count your total emitters against your plan to confirm nothing was missed.
⏱️ Install Your Timer & Irrigation Controller
Time required: 30–90 minutes · Automate your system for Riyadh’s climateA timer or controller transforms your drip system from a manually-operated tool into a fully automated life-support system for your garden. In Riyadh’s climate, this automation is not optional — missing a single watering session during a 48°C summer day can kill established plants.
Types of Controllers Available
Mechanical Tap Timer
- Cheapest option — 50–150 SAR
- No electricity required
- Simple dial programming
- Connects directly to outdoor tap
- Limited flexibility — one zone only
- Good for simple small gardens
Smart Wi-Fi Controller
- 300–1,500 SAR investment
- App-controlled from smartphone
- Weather-adaptive scheduling
- Soil moisture sensor support
- Multi-zone management
- Best ROI long-term in Riyadh
Programming Your Controller for Riyadh
Set your controller to run irrigation sessions in the pre-dawn hours only (4:00–6:00 AM). This is critical in Riyadh — morning watering allows maximum soil absorption before the day’s heat begins, and eliminates evaporation loss that occurs when watering during daylight hours.
- ✓Set watering START time to 4:00–5:00 AM Allows water to soak in before temperatures rise — maximum efficiency
- ✓Set DURATION based on emitter flow rate × plant water need Example: 4 L/hr emitter delivering 2L to plant = 30-minute run time
- ✓Set FREQUENCY based on current season Summer: daily · Spring/Autumn: 3–4×/week · Winter: 1–2×/week
- ✓Enable rain delay or weather sensor if available Prevents system running during and after the rare Riyadh rainfall events
Invest in a soil moisture sensor system if your budget allows. These sensors measure actual soil moisture and only trigger irrigation when plants genuinely need water — eliminating the guesswork that leads to either overwatering (root rot) or underwatering (drought stress) in Riyadh’s variable climate.
✅ Step 6 complete when: Controller is installed and programmed with correct zone schedules, start times (4–5 AM), run durations, and frequency settings for the current season. Test a manual activation of each zone from the controller before moving to the next step.
🧪 Test, Flush & Calibrate Your System
Time required: 1–2 hours · Never skip this stepTesting before finalizing installation reveals problems that are easy to fix now but expensive to correct later. Every single drip system has issues on first test — missed emitters, popped-off fittings, kinked laterals, or pressure problems. Expect to find and fix 5–15 issues during this stage.
The Flush Test — Before Emitters Are Installed
This critical step is often skipped — don’t make that mistake. Before inserting any emitters, remove all end caps and run water through the entire system for 2–3 minutes. This flushes sand, pipe shavings, and debris from installation that would otherwise immediately clog your new emitters.
- 1Remove all end caps from lateral lines Every line end must be open during flushing
- 2Turn water on slowly to avoid pressure surge Open the tap gradually — sudden pressure can pop fittings off
- 3Run water for 2–3 minutes through every line Watch the water flowing from each open end — it should run clear, not brown or cloudy
- 4Check every fitting for leaks or drips Mark any leaking fittings and fix before proceeding to emitter installation
- 5Replace all end caps securely Once flush water runs clear, cap all lines before inserting emitters
The Emitter Performance Test
After emitters are installed, run the system for 30 minutes and physically walk through every zone checking each emitter. You’re confirming: every emitter is dripping (not spraying or blocked), no fittings have popped off under operating pressure, and the wetted area on the soil surface matches your expected plant root zone.
Pressure Verification
Connect a pressure gauge at the furthest emitter from your water source. It should read 0.8–1.2 bar during operation. Below 0.8 bar means too many emitters per zone — split into two zones. Above 1.5 bar means your pressure regulator is failing — replace it immediately.
⚠️ Common First-Test Problems and Quick Fixes
Emitter not dripping: remove, clean, and re-insert — may be clogged with installation debris. Fitting popped off: re-soften pipe end in hot water and re-insert. Uneven delivery across zone: too many emitters — split the zone. Leaking at threaded connection: re-wrap with additional PTFE tape and re-tighten.
✅ Step 7 complete when: All emitters are dripping correctly, no fittings are leaking, operating pressure is within range (0.8–1.5 bar), and the wetted soil area at each plant matches the root zone. Document any adjustments made for future reference.
🌾 Apply Mulch & Finalise Your Installation
Time required: 1–3 hours · The finishing touch that transforms your system’s efficiencyApplying mulch after drip installation is the final step that dramatically amplifies your system’s water efficiency. In Riyadh’s extreme heat, surface evaporation without mulch wastes 30–50% of the water your drip system delivers. Mulch locks that moisture in the root zone where it belongs.
Mulch Application Over Drip Tubing
Your drip tubing can be left on the soil surface under mulch — in fact, this is ideal. The mulch protects the tubing from UV degradation (extending its life from 3–4 years to 8–10+ years), keeps the pipe cooler (reducing thermal expansion), and hides the system for a cleaner visual appearance.
- ✓Apply mulch AFTER system testing is complete Never mulch before testing — you’ll need to move it to access fittings and emitters
- ✓Apply mulch in a 5–8cm deep layer across all plant beds Deep mulch is critical in Riyadh — thin layers dry out and blow away rapidly
- ✓Keep mulch away from plant stems (5cm clearance) Mulch touching stems traps moisture and causes crown rot and fungal disease
- ✓Leave emitter heads slightly above mulch surface or flush with it Completely buried emitters clog faster — keep the delivery point accessible
Marking Your System Below Mulch
Before covering tubing with mulch, take photos of your complete system layout from multiple angles. Store these photos permanently — you’ll need them when adding new plants, locating emitters for cleaning, or finding fittings during seasonal maintenance. A simple hand-drawn map marked with measurements from permanent structures works perfectly.
For Riyadh’s desert climate, gravel or crushed stone mulch outperforms organic mulch in plant beds that are not regularly replanted. It never needs replacing, doesn’t blow away in wind, and doesn’t harbor pests. Use organic mulch (wood chips, bark) only where you regularly change seasonal plants.
✅ Step 8 complete when: All plant beds have 5–8cm of mulch, emitter heads are accessible, stems have 5cm clearance, and your system layout is photographically documented for future maintenance reference.
📅 Set Your Seasonal Watering Schedule
Time required: 30 minutes now · Adjust every seasonYour watering schedule is not a one-time setting — it must be actively adjusted throughout the year as Riyadh’s temperature and conditions change dramatically between seasons. The wrong schedule in summer under-waters plants; the wrong schedule in winter over-waters them and causes root rot.
Riyadh Seasonal Watering Schedule Guide
Use this schedule as your starting point and adjust based on actual soil moisture observations:
| Season | Frequency | Run Time | Start Time | Key Notes |
|---|---|---|---|---|
| ☀️ Summer (Jun–Sep) | Daily | 30–45 min | 4:00–5:00 AM | Monitor daily — heat demand spikes suddenly |
| 🍂 Autumn (Oct–Nov) | 3–4× / week | 20–30 min | 5:00–6:00 AM | Recovery phase — adjust as temperatures drop |
| ❄️ Winter (Dec–Feb) | 1–2× / week | 15–20 min | 8:00–9:00 AM | Avoid pre-dawn in cold months — frost risk |
| 🌸 Spring (Mar–May) | 3–4× / week | 20–35 min | 5:00–6:00 AM | Increase gradually as temperatures rise |
The Soil Check Method — More Reliable Than Any Schedule
No schedule is perfect for every garden. The most reliable watering indicator is to push your finger 5cm into the soil near a plant. If it’s moist, skip watering. If it’s dry, water is needed. Do this check weekly and use it to fine-tune your controller settings. Over time, you’ll develop an intuition for your garden’s specific needs.
✅ Installation Complete! Your drip irrigation system is fully operational. Set a calendar reminder to perform the monthly maintenance check described in the next section — this keeps your system running at peak efficiency for years.
Prefer Professional Drip Irrigation Installation?
Our certified irrigation specialists design and install complete drip systems for Riyadh gardens — with a full performance warranty and ongoing maintenance support included.
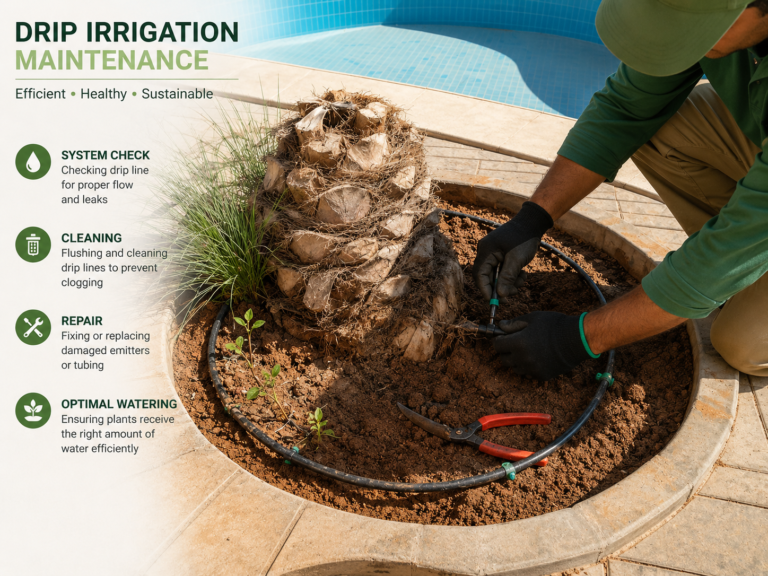
🛠️ Ongoing Drip System Maintenance Schedule
Keep Your System at Peak PerformanceA drip irrigation system requires regular maintenance to perform well in Riyadh’s challenging environment. Sand, hard water mineral deposits, UV degradation, and heat-induced component stress all affect performance over time. This maintenance schedule prevents small issues from becoming expensive failures.
| Frequency | Task | Why It Matters |
|---|---|---|
| Weekly (Summer) | Visual check of all emitters — confirm dripping correctly | Catches blockages before plants show drought stress |
| Weekly (Summer) | Check controller settings and battery level | Controllers fail silently — a missed session kills plants in summer heat |
| Monthly | Clean or replace Y-filter screen | Riyadh’s sandy water clogs filters rapidly — a clogged filter kills system pressure |
| Monthly | Flush all lateral lines by briefly removing end caps | Flushes accumulated mineral deposits and sand that slowly narrow internal diameter |
| Monthly | Check all fittings and connections for drips | Heat cycling loosens connections over time — early detection prevents water waste |
| Monthly | Clean clogged emitters with diluted vinegar soak | Riyadh’s hard water creates calcium deposits that restrict emitter flow within 3–6 months |
| Seasonal | Adjust controller schedule for new season | Wrong schedule wastes water in winter or under-waters in summer — major plant health impact |
| Seasonal | Inspect all tubing for cracks, brittleness, or UV damage | UV-degraded tubing cracks suddenly — catching early prevents large-area water loss |
| Bi-Annual | Full system pressure test with gauge | Verifies pressure regulator is still functioning — failing regulators damage emitters |
| Annual | Replace filter screen and inspect pressure regulator | These components have finite lifespans — annual replacement is cheaper than emergency repair |
| Annual | Check and update controller battery / power supply | Dead batteries are the #1 cause of “mysterious” plant death in automated gardens |
How to Clean Clogged Emitters
Even with a good filter, emitters in Riyadh’s hard water environment will develop calcium/mineral deposits within 6–12 months. Cleaning is simple: remove the emitter, soak in a 50/50 white vinegar and water solution for 2–4 hours, rinse with clean water, and use a toothpick to clear the internal orifice. Reinstall and verify flow before re-covering with mulch.
Keep a “spares kit” near your water source: 10 replacement emitters, 5 goof plugs, 3 spare fittings, 2 end caps, a roll of PTFE tape, and spare filter screens. When something fails during a maintenance check, you can fix it immediately rather than waiting for a hardware store trip while your plants bake in Riyadh’s heat.
🔍 Troubleshooting Common Drip Irrigation Problems
Diagnose & Fix FastEven well-designed, properly installed systems develop problems over time. Here’s how to diagnose and fix the most common issues quickly — before plants suffer in Riyadh’s unforgiving heat.
Emitters Not Dripping or Dripping Very Slowly
Plants appear dry despite system running. Emitters show little or no output when system is active.
Possible Causes
- Clogged emitter orifice
- Blocked filter
- Low system pressure
- Kinked lateral tubing
Step-by-Step Fix
- Check and clean the Y-filter screen first — this is the most common cause
- Remove the emitter and soak in vinegar solution for 2–4 hours
- Check all tubing runs for kinks that restrict flow to that zone
- Test system pressure at the zone — if below 0.8 bar, split the zone into two
- Replace emitter if cleaning doesn’t restore full flow
Fitting Popped Off — Major Water Leak
Water gushing from a disconnected fitting. Happens most often during hot afternoons when pipe is expanded.
Possible Causes
- Fitting not fully inserted
- Thermal expansion stress
- Pipe not softened before fitting
- Fitting barb too small for pipe
Step-by-Step Fix
- Turn off water supply immediately to prevent plant flooding and water waste
- Wait until morning when pipes are cool before attempting repair
- Soften pipe end in hot water for 30 seconds before re-inserting fitting
- Push fitting in until it will not go further — both barbs must be fully seated
- Add a small hose clamp over the fitting for extra security in repeat-failure locations
- Install tubing stakes on both sides of the fitting to prevent pull-out from tension
Uneven Delivery — Outer Plants Getting Less Water
Plants near the water source are over-watered; plants at the far end of lines are dry despite same emitter size.
Possible Causes
- Too many emitters on one zone
- Pressure drop over long line runs
- Non-pressure-compensating emitters
- Partial filter blockage
Step-by-Step Fix
- Replace all emitters with pressure-compensating type — they deliver equal flow at 0.8–3.5 bar
- Split the zone into two separate lines if total emitter count exceeds capacity
- Reduce lateral line length — maximum 30m from branch point for 16mm tubing
- Clean the filter and test pressure at both near and far end of the problem zone
- Increase main line diameter from 25mm to 32mm if serving very long distances
System Not Running — Controller Failure
Garden is dry. System does not activate on schedule. Plants show drought stress despite believing irrigation is running.
Possible Causes
- Dead controller battery
- Power outage reset settings
- Faulty solenoid valve
- Sensor override blocking activation
Step-by-Step Fix
- Replace controller batteries immediately — always keep spare batteries accessible
- Manually open the water supply to check if system flows without controller
- Recheck all controller programming — power cuts often reset settings to factory default
- Test solenoid valve by manually activating it — if no flow, valve has failed and needs replacement
- Disable weather sensors temporarily to rule out sensor override as the cause
- Immediately hand-water stressed plants while diagnosing — never leave plants without water in summer
Overwatering — Soil Waterlogged, Plants Yellowing
Soil is constantly wet. Plants show yellowing leaves, wilting despite wet soil, or signs of root rot. Water pools on surface.
Possible Causes
- Run time too long
- Frequency too high for season
- Wrong emitter flow rate
- Poor drainage in soil
Step-by-Step Fix
- Reduce controller run time by 30–40% immediately
- Reduce frequency — check seasonal schedule table and adjust accordingly
- Allow soil to partially dry between sessions — test with finger at 5cm depth
- Check for broken or stuck-open emitters delivering continuous flow
- Review soil drainage — add organic matter and sand to improve water movement
- Consider switching to lower flow-rate emitters for drought-tolerant plant zones
❓ Frequently Asked Questions
Everything You Need to KnowA small garden system (up to 50 plants) can be installed in a single day by a capable DIY homeowner. A medium villa garden (50–150 plants with 3–5 zones) typically takes 2–3 days. Professional installation teams complete similar projects in 1–2 days due to experience and specialized tools. Allow extra time for planning, testing, and adjustments — never rush the testing phase.
DIY material costs range from 800–3,000 SAR for a typical home garden depending on number of plants, zones, and whether you add a smart controller. Professional installation (materials + labor + design) ranges from 2,000–8,000 SAR for residential gardens. The investment typically pays for itself within 12–18 months through reduced water bills alone in Riyadh.
During Riyadh’s peak summer months (June–September), most gardens require daily irrigation — typically a 30–45 minute session starting at 4:00–5:00 AM. The exact duration depends on your emitter flow rates and plant types. Drought-tolerant species can often go every other day even in summer. Always verify by checking actual soil moisture — push your finger 5cm into the soil to confirm it’s drying between sessions.
Yes — drip irrigation is one of the most DIY-friendly home improvement projects available. With the right components, the planning steps outlined in this guide, and patience during testing, most homeowners can successfully install a complete system. That said, for large villa gardens with multiple zones, smart controllers, and underground main lines, professional installation ensures optimal hydraulic design, correct pressure calculations, and a system warranty that DIY cannot provide.
For the majority of garden shrubs and medium-sized plants in Riyadh, 2–4 L/hr pressure-compensating emitters are the most versatile choice. Use 1–2 L/hr for small plants and cacti, 4 L/hr for large shrubs, and 4–8 L/hr emitters (multiple per tree) for palms and mature trees. Always choose pressure-compensating emitters — they deliver equal flow throughout your zone regardless of distance from the water source.
Riyadh’s water supply is high in dissolved minerals (calcium and magnesium) that form deposits inside emitters over time. Additionally, the city’s sandy environment introduces particulate matter that bypasses inadequate filters. Solutions: upgrade to a 120-mesh or finer filter (replacing monthly), use pressure-compensating emitters with larger internal orifices (harder to clog), add a fertilizer injector with citric acid to periodically flush mineral deposits, and clean emitters in vinegar solution every 3–4 months.
Yes — but it requires additional management. Use a high-quality 120+ mesh filter, clean it monthly, and periodically soak emitters in diluted vinegar to dissolve calcium deposits. Some gardeners add a small citric acid injection unit to the system to reduce mineral scale buildup throughout the entire pipeline. For large systems, a water softener upstream of the irrigation supply provides the most comprehensive solution.
For main supply lines crossing pathways or high-traffic areas, burial in conduit (10–15cm deep) is recommended for protection from foot traffic and to prevent UV exposure. For lateral lines and emitter runs in plant beds, keeping them just on the soil surface (under mulch) is actually preferred in Riyadh — it allows easy access for maintenance, emitter cleaning, and future modifications without digging. Surface pipes under mulch last as long as buried ones with proper UV-stabilized materials.
With UV-stabilized components, a quality filter, professional installation or careful DIY, and regular maintenance: main line pipes last 10–15 years, lateral tubing 8–12 years, emitters 3–8 years (depending on water quality and cleaning frequency), controllers 5–10 years, and pressure regulators 5–8 years. The weakest link is almost always emitters in hard water environments — budget for partial emitter replacement every 4–6 years as part of your maintenance planning.
Pressure-compensating emitters maintain consistent flow rate (e.g., exactly 4 L/hr) across a wide pressure range (0.8–3.5 bar). Standard emitters change their output based on pressure — plants near your water source get more water than plants at the far end of the line. In any garden larger than 3–4 plants on a single line, pressure-compensating emitters are essential for even delivery. They cost slightly more (1.5–3 SAR vs 0.5–1 SAR each) but are worth every riyal.
💧 Need Help with Your Drip Irrigation System?
Whether you need professional installation, a system design review, or ongoing maintenance support — The Gardens Guru team is ready to help your Riyadh garden thrive.